

This is a solar bike manifesto primer for anyone who has an ebike and is considering adding solar charging. It’s difficult to write for all levels from novice to expert so this advice is most likely to be helpful to someone who has installed a DIY ebike conversion kit. If your experience is limited to riding a factory, turn-key ebike and you don’t do your own maintenance and repairs then you will want to get help from a friend or family member before trying a solar upgrade. Hint: find someone who has their own multimeter.
About me
I have logged 50,000 miles (80,000 km) on ebikes over the past 13 years. About a quarter of those were touring and road-testing miles with various solar panels for charging the bike. I’ve built several solar ebikes over the years and I’m pleased to report that it is indeed possible to combine these technologies. Whether or not it makes sense to do so will depend on your goals and your budget.

Maybe solar panels are not for you?
If you’re only doing a couple of weekend ebike trips each year, my advice would be to skip the solar panels, borrow a friend’s battery and plug-in charger in addition to your own and find electrical outlets along the way. In fact, anyone who has reliable access to electrical outlets at the end of each day will find that carrying solar panels on the bike is less convenient and more expensive.
But I WANT to put solar panels on my bike!
Ok, I get it. You’ve seen photos and videos of solar bikes and you want to get in on the fun. Maybe you’re curious about solar power and want to extend your range? Perhaps you want to use solar panels as decorative plumage to attract a like-minded mate? It’s certainly a conversation starter. If you don’t enjoy being the center of attention wherever you go, this might not be the path for you.
I’ve come to think of solar upgrades as falling into two broad categories:
- Range extenders: 50-200 watt solar panels to supplement your plug-in charging. Expect to get about 5 miles (8 km) of added range for every hour of charging under ideal conditions with a 100 watt panel. This is a great beginner project because it keeps the cost and complexity low while you learn the basics. You can always upgrade later. Folding panels can be stowed in your panniers and deployed when stopped or strapped to your bike/trailer to collect energy all day. Most trailers will fit a 100-150 watt panel easily.
- Off-grid touring: 200-400 watt solar panels for ultimate roaming freedom away from electrical outlets. Expect to get 50-100 miles (80-160 km) per day. You will need to mount them on the bike so they collect energy all day which presents some challenges due to the large surface area. Recumbents and cargo bikes are popular in this category but I’ve seen some awkward attempts to attach this much to a conventional upright bike.
These range estimates assume you can manage to pack light and always pedal at a moderate effort. Expect to consume about 15 watt-hours per mile (9 Wh/km) while averaging around 14 mph (23 kph). If you’re riding uphill all day, into a headwind, in the rain, without pedaling, then your mileage will vary. These are long-term average values. You’ll get more on a sunny day, less on a cloudy day. If you’re unwilling or physically unable to pedal, cut the daily range estimates in half.
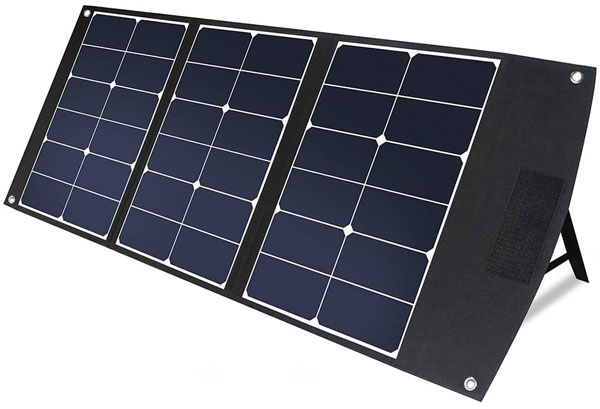
You can use any solar panel you want but “semi flexible” panels made with Sunpower cells for boats and RVs (campers/motorhomes) are your best choice in terms of power per unit weight and ability to withstand rough treatment on a bike. You can find them in all kinds of sizes on your favorite shopping site for around US$2 per watt and up. Traditional glass/aluminum frame rooftop panels are too heavy and should be avoided.
Battery
The size of your battery has some bearing on the efficiency of your system but does not determine your range in an off-grid situation. Assuming you’re trying to maximize distance traveled in a day, a bigger battery means you can take longer breaks before your battery is full, at which point you have to choose between getting back on the road or wasting potential solar energy because it has nowhere to go. That’s right, longer charge times are actually a feature. Conversely, an undersized battery (300-400 Wh) coupled with a large solar panel may run into problems with too much charging current for the battery cells or the BMS to handle. In that case, you’ll need to explore getting a bigger battery or using multiple batteries with multiple charge controllers.
Charge controller
Speaking of which, how do you connect your solar panels to your battery? You’ll need a “boost solar charge controller.” Just copy and paste those words into your favorite shopping site. You should find a couple of inexpensive Chinese models with MPPT for around US$30-75. A charge controller is a DC to DC converter which takes the solar panel’s output and converts it to the voltage needed to charge your battery. The “MPPT” business means that it automatically adjusts to finds the “Maximum Power Point” at which the panel’s voltage times current produces the most power. This varies depending on solar irradiance and temperature so we need to have Maximum Power Point Tracking to always extract the most power from our solar panel.
The output can be programmed in 0.1V increments to match your battery voltage. If you have the budget, you should get a Genasun boost controller for US$205. These are not programmable but are available in fixed output voltages. The “WP” version is fully potted which means it is waterproof and vibration resistant. They use higher quality components and run cooler, which should (theoretically) make them last longer. Because they don’t need a big heat sink, they are lighter. I’ve done my own performance tests, measuring watt-hours while stationary (unshaded) and moving (mixed shading) and found that the Genasun controller produced about 2% more over the course of a typical day while touring. Here’s a comparison video created by a fellow solar bike enthusiast.

Most solar charge controllers on the market today are made for lead batteries and can only be set to increments of 14.4V, corresponding to nominal 12/24/36/48V lead batteries. You cannot use these safely with your lithium ebike battery. Some of these unsuitable chargers may even state that they support “lithium” but upon closer inspection you may find that they only support multiples of 4 LiFePO4 battery cells in series which happen to like being charged to exactly 14.4V (4*3.6=14.4). Most other lithium cell chemistries need 4.2V per cell so you’ll need 42.0V, 54.6V or 58.8V for your nominal 36/48/52V pack. Your charger will need to be configured to the exact voltage your battery pack needs. If you’re unsure, figure it out before you plug anything into your pack. The labels on the charger that came with your bike and your battery itself are good starting points.
These controllers have PV input ranges which will work with most solar panels — just make sure that the open circuit voltage of your panel (VOC) is less than your battery voltage when empty (around 3.2V per cell) or you may find that you will not be able to charge when the input voltage is higher than the output voltage under some conditions (low battery on a cold day). Understand the specifications of your battery, charge controller and solar panel, keeping in mind that the solar panel voltage is lower than the label value when it gets warm. More on that here.
You may be able to connect two small panels in parallel but with larger panels that will likely exceed the maximum input current so you may need multiple charge controllers. There are trade-offs to be made: for example, a higher input voltage will result in better controller efficiency than a lower input voltage but connecting panels in parallel will give you better partial shading mitigation which matters if any part of your bike or body casts even small shadows on the panel.
If you have a Bosch, Yamaha or Shimano battery… I offer you my condolences. These closed, proprietary systems make it much more difficult to modify and enjoy your bike as you see fit. They’re well-engineered systems, designed to maximize corporate shareholder value and minimize liability and warranty claims. These vendors have no interest in helping you with your wacky solar modification project or supporting inter-operability with equipment from other vendors. If you’re doing pre-purchase research and solar charging is important to you then brands which reject open standards do not deserve your business.

I’ve read that you can trick the Bosch batteries into accepting a charge from a non-Bosch source by applying +5V to the signal pin and keeping charge current at 4A or less. If anyone knows a similar trick that will work with Yamaha or Shimano, please let me know. I know several solar ebike enthusiasts who charge using AC inverters on the bike using the charger that came with their bike and an intermediate 12V battery but these workarounds are heavy and inefficient. They should only be considered as an option of last resort.
I have written extensively about my solar conversions. I mention this as proof of real world experience in this subject matter and not as an example of a low-cost beginner project. Hopefully, my build will provide some inspiration for what is possible. You can do it. Start small and keep it simple. Add more later after you’ve had your first success. It’s not rocket science. If budget is an issue, you may find used solar panels on eBay, craigslist or your local equivalent. Or reach out to local solar installers or RV/boat supply shops and ask if they have any returned, blemished or damaged panels they’re willing to donate to you. Most of all, stop “thinking about it” and get out there and start doing something about it.
My current build has a 315 watt solar array good for around 80 miles (130km) per day. Just for fun, I recently did a 207 mile (333km) single-day ride using 784 Wh from grid-charged batteries and generating 2266 solar Wh so roughly equivalent to carrying six 500 Wh ebike batteries. Here’s a video.
If you want to learn more, I recommend watching the following presentation by someone who is far more knowledgeable than I.
Happy solar biking.

Kudos, Mark. A very concise and extremely well-reasoned opening statement for all of us bikers who’ve dreamed about riding on ‘free’ sunshine. Your slings and arrows have not been suffered in vain!
p.s. I hope your teaser about children throwing rocks will be another story in our futures.
LikeLiked by 1 person
Thanks, HJ. I’ve learned a lot from private correspondence with people who were doing their own solar upgrades over the years.
The Ethiopia anecdote is based on first person accounts of bike travel in that country I read about while planning my route through Africa, not my own personal experience. At least not yet.
LikeLike
Hi Mark, excellent point all round and what a trip! Really enjoyed your talk. Couple of points come up for me: hub motors in comparison to mid mount motors are often criticised for their low low speed power and inefficiency mainly because they do not get the benefit of the bike gearing… so why not use them? And, they would remove the weight from the wheel too. I know you would loose the benefit of braking power recovery but that is supposed to be quite a small amount. Maybe that could be improved by using the bike gears to speed up the motor during braking just like in a car… of course that would need affixing the rear freewheel and fitting it to the pedal assembly instead and using a igh or maybe using a Pinion front gearbox. Asside I wonder if Pinion would be interested in incorporating all that and adding a motor input?! They are in a perfect place to do it imho. Secondly I have yet to see anyone using a velo body-shell. I wonder why that is? They are aerodynamically far superior and could thus further minimise power losses and thus solar panel sizes and thus weight and so on. And further improvements could be realised by “hiding” the panniers from the wind too so a huge benefit could again be realised maybe allowing smaller motors and panels again. Imagine is a 100w panel was enough because the braking regen was so good and losses were so small. Phew so much fun could be had in researching this.
LikeLike
Hi dingodreams. I had a BBS02 mid-drive for 16,000 miles and I really liked it. I still think they’re ideal for mountain bikes but for long distance touring my direct drive front hub is a far better choice. It’s 0.3kg lighter, has no clutch or gears to break down, is much quieter and I get better mileage, probably due to the more efficient field-oriented motor controller and no gearing losses inside the motor assembly. As for regen, I get 8-10% on flat terrain, 18-25% on hilly terrain. I haven’t changed brake pads in 2 years/10,000 miles and I just did my first chain replacement after 10,000 miles (BBS02 had to replace every 3,000 miles).
As for fairings, I’ve tried a velomobile and they’re great but hell to transport across oceans. As for retrofitting recumbents, I’ve tried and couldn’t get measurable results. The full “bodysock” fairing looks like it would work but it’s hard to get in and out of and creates a huge cross-wind profile which is probably why they’re so rare. I know of several solar velomobile conversions. Check out https://youtu.be/2RknNzrV0RE or https://www.longwayhometo.eu/ or https://www.instagram.com/canton_veut_on_peut
LikeLike
Hi Mark, thanks for your thoughts. I wonder how the losses would compare using all same controllers. I sounds like your mid drive setup used a different controller so that just the front motor hub or mid motor plus gears are the variables. Im just theorising at this stage but I have read that hub motors are not ideal at low speeds and that electric motors in general are most efficient at high speeds and hence they are usually geared down a lot. So climbing hills would be the worst situation for a hub drive. Your regen numbers are really impressive I must say even on flat terrain. I’d love to see it develop to a level where physical friction braking is relegated to emergencies only and can only see that being possible via external gearing like in a car or motorbike one can brake using the friction in the motor from highway speeds down to running or maybe even walking speed. The limits there being the limited rev range of petrol motors. Electrics have a much greater upper rev range and in fact generate exponentially more power at higher rpms. The problems I haven’t thought a way out of is how the bicycle gear and freewheel systems are set up. It is hard to drive the motor to achieve regen in mid drive situation. Lime I said earlier Pinion are in an excellent situation to give the pedals a freewheel and couple a mid drive motor to the gears and wheels. Clutch could be achieved via electronic means ie removing the load prior and through a gear change which is only a second. Thanks for the links I will indulge in a few minutes. Btw are you on your big trip? How’s that going?
LikeLike
A few more advantages of the direct drive hub over the mid-drive come to mind: the human powered drivetrain is now completely independent of the electric drivetrain so it’s more likely that I can get back to civilization in the event of a mechanical or electrical failure. I now have two-wheel drive so I get better traction up loose gravel slopes. The BBS02 transmitted a slightly annoying vibration to my feet through the pedals which made my feet numb on very long days (8 hours+). After two years and 10,000 miles with the front hub, I’m quite happy with my setup and would not consider going back to a mid-drive.
Clearly, the mid-drive configuration continues to be popular because it works. I don’t see hub motors as superior for every user in every situation. However, keep in mind that the adoption of mid-drives by Bosch, Yamaha and Shimano have as much to do with their desire to create buyer lock-in via custom frames (hub motors can easily be moved to another bike) and the advantage of mid-drives to create high torque at low speeds within the 250W limitations of the European and Australian ebike markets.
I used to get around 18 Wh/mile and average around 18 mph on my BBS02. A typical 30 mile evening ride through the Oakland hills today is more like 14 Wh/mile and 17 mph average. Some of that is because I have a smaller battery now so I’ve reduced the amount of assist I use so a little more of the power comes from pedaling. I also have a lower top speed due to the 36V battery and direct drive hub in a 20″ wheel so it’s hard to say which factors contributed most.
As for regenerative braking: powerful, proportional regen is amazing. I have mine set to 30A battery current and 90A motor phase current, modulated with a Domino short-throw throttle. That’s up to 1000 watts of braking power. The high phase current is key to bringing the bike to a full stop otherwise the braking force fades at low RMPs. I’ve learned to anticipate stops much earlier than I used to but now it’s second nature. I only use my friction brakes to hold the bike in place at stop lights, during emergency stops and on steep descents down wet, curvy roads because the regen braking is all on the front wheel and I’ve had a couple of falls due to front wheel lock-up under those conditions.
Pinion looks like they have solved some of the limitations of their original model and I’m happy to see a strong competitor to Rohloff but I think I still prefer my Rohloff IGH. Given the high cost, the option of transferring my Rohloff to any other bike is a big plus. It sounds like maybe you’re debating a purchase decision? You’ve probably seen Alee’s video? https://youtu.be/W_hx4V9mYuw
One final video recommendation. Justin Lemire-Elmore did a 2 hour presentation last month on ebike motor and system efficiency. He goes into great detail about motor RPM, maximizing range, gearing options, hub vs mid-drive motors and more. Highly recommended: https://youtu.be/dxJe_gygRGU
The world tour is on hold but I’m planning a two week tour in California later this month… hopefully. The Pacific Coast Highway is calling my name.
LikeLiked by 1 person
O wow lots of goodies to watch and read. Thank you for the numbers on regen effectiveness- it was a big showstopper for me in terms of hub motors. Looks like that’s no longer an issue. I was wondering how you were getting those regen amperages in one of your youtube videos. Are those settings you mention a function of a specific motor controller? Cheers and thanks for all the facts and links.
LikeLike
I’m using a Grin Tech PhaseRunner controller and this is my first and only experience with regenerative braking because my previous motors didn’t support it (BBS02 mid-drive and before that a geared rear hub with clutch). I think I’ve read that some motor controllers only support one pre-set level of regen vs. proportional control. I don’t know if other controllers have the option to set the phase amps separately from battery amps but that’s key to low speed stopping power. At low RMPs, the motor voltage is much lower so the controller acts as a DC-DC step-up converter and boosts the motor voltage to battery voltage (at a lower amperage since the wattage remains fixed). Just before the bike comes to a full stop, the wattage reading on the Cycle Analyst actually goes from negative to positive again. I don’t fully understand how that works. The controller is injecting current to fully stop the motor? Anyway, it works a treat.
I also had to consider how much regen current my battery pack can handle. If you’re referring to my video with the data overlay at the top of the screen, I had the battery regen current set to 40A back then which was too much for my 400 Wh battery pack (10s4p LG MG1 cells). I’ve since reduced the battery regen current to 30A and increased the pack to 600 Wh (10s6p) and that eliminated the issue with the BMS cutting out due to excess charge current.
The LG MG1 18650 cells are rated for 1.0C/2.85A max charge current but they can handle more for short intervals such as during braking. It’s all about keeping the cells below 60°C. I’ll have to watch the battery temperature carefully when I eventually encounter much longer, steep descents than I find around here, particularly since my 315W solar array can be contributing as much as 8A of charge current in addition to the regen current. My next pack will use Samsung 30Q cells which can handle a little more charge current per cell.
LikeLiked by 1 person
Ahh those lovely Grin Tech wizards, if I could get a job there I would be like the proverbial pig in …t. Their stuff sure makes me smile. The set regen level is all I have heard about along with comments like it is worthless because you’re lucky to gain extra 10%. I hear that from Toyota Prius owners and other people. At one point I suggested we implement that on our urban train system and was shocked to hear that their past experiences showed only 10%….. It is so upsetting to see good innovation hampered by bad engineering/business practices. I bet all those units (except Grin) were built to a price dictated by accountants…. Sorry, my pet hate. Thinking about your regen charging dilemma, would some supercaps perhaps take up the peaks and spread them out? Would have to be quite a large supercap bank as you’re generating quite some amps there. Looks like you’re having quite a lot of fun there. Keep it up.
LikeLiked by 1 person
dingodreams said: “I’d love to see it develop to a level where physical friction braking is relegated to emergencies only…”
It’s already there. For another (much smaller) dataset, see http://erowbike.com/eG20#trip_stats, That data is also based on a Grin All-Axle front hub coupled with a Phaserunner. My experience lines up with Mark’s “to a T”. Note that I get all the braking I need with a max of 15.7 amps going back into the battery — typical braking is *considerably* less. Of course, we don’t have big mountains here in MN.
I’ve had many miles of prior experience with regen braking, including several big Crystalyte rear hubs, BionX, and Copenhagen Wheel motors as well.
All were effective, and I liked them all, but the Grin front hub (fast winding in a 20″ wheel) is the one I finally married. As Mark said, it’s effective to a nearly full stop due to the fact that it appears to inject a bit of current back into the motor for the final stop. I wouldn’t be surprised if Justin adds an electric ‘parking brake’ feature for holding the bike steady at stop lights (this probably applies more to the recumbent bikes that Mark and I ride), but it would be a nice addition to the ‘virtual freewheeling’ feature recently added.
I think the idea of using supercaps must be a common dream for everyone who knows what they can do. I used an array of 5,000 Fd Maxwell supercaps to be a huge and instantaneous current sink. It can be made to work, but it turns out that for the added complexity, size, and $1,200, it was much more effective to simply use a higher capacity battery (see Mark’s math in previous comments above and elsewhere). Using the Samsung 30Q cells, even a ‘tiny’ battery like the Luna Mighty Mini (14S2P) is useful for me for trips up to 25 miles, since many of my rides are sub-10wattHrs/mi. If you typically haul your own power generating station behind you, your mileage *will* vary (l leave mine behind, on the roof at home)!
LikeLiked by 2 people
What products are you using for the solar tracker?
LikeLiked by 1 person
Hi Betsy. Mine is scratch-built using custom mounting hardware, motor, sensors and an Arduino microcontroller I programmed myself. There are some products and kits available online to motorize solar panel tracking but solar panel prices are so low now that for most applications it’s cheaper and far more reliable to go with a fixed tilt solution and just an extra panel or two… unless you enjoy fiddling with the system on a regular basis to keep it operational.
LikeLike
When selecting solar panels to charge a 48-52V battery, is it better to use a single large panel that generates 12V, or multiple smaller panels in series for higher voltage? I understand the MPPTs get less efficient as the step up from panel to battery voltage increases, but I can’t find any quantification of that. Next, if higher voltage is better, how much is too much? MPPTs are meant to step up voltage, would a 4 panel / 48V system sometimes create too much voltage for the MPPT charging a 48V battery?
LikeLiked by 1 person
Great questions. I was starting to think no one would ask. I tried to cover most of this in another post so that might be a good read for more details: https://solare.bike/2020/12/27/designing-a-safe-and-efficient-solar-ebike/
> When selecting solar panels to charge a 48-52V battery, is it better to use a single large panel that generates 12V, or multiple smaller panels in series for higher voltage?
Keep in mind that “12V panel” is an outdated term which used to mean “probably safe to connect directly to a flooded 12V lead-acid battery without a charge controller.” The term is less relevant today since small, efficient charge controllers are relatively cheap and lithium batteries have replaced lead acid for many applications.
>I understand the MPPTs get less efficient as the step up from panel to battery voltage increases, but I can’t find any quantification of that.
Here’s a post from someone who tested the Genasun controller at different input voltages and power levels. The difference between the best case and worst case scenario is around 10% but in the real world you’re more likely to be facing a choice between two modules in series vs two modules in parallel in which case the difference is likely to be less than 5% across the range of real-world power levels. https://endless-sphere.com/forums/viewtopic.php?f=3&t=28436&p=1232578#p1232578
It matters more if your solar panels are susceptible to partial shading losses or not. If all your panels are roof mounted on your bicycle and no part of the bike or rider will ever shade any part of the panels, then go for slightly higher controller efficiency choosing the highest possible input voltage.
However, if your panel(s) are on a trailer behind the bike where it’s going to be occasionally shaded by the bike or rider then you will likely experience much more than 5% power losses from just one or two shaded cells. In that case, you are better off using several smaller panels in parallel so that partial shading will only impact the one shaded panel instead of losing 90%+ of the output from all the panels connected in series. This is what I did on my bike.
> Next, if higher voltage is better, how much is too much? MPPTs are meant to step up voltage, would a 4 panel / 48V system sometimes create too much voltage for the MPPT charging a 48V battery?
Absolutely, yes. “Nominal 12V” solar panels typically have a Voc of 19-22.5 volts. If you connect two of these in series, your charge controller may see as high as 45 volts on the input side on a cold winter morning. If your “48V” lithium battery is deeply discharged, it’s voltage may be as low as 39V. At that point, the charge controller will refuse to begin charging because the input is higher than the battery voltage. It’s not smart enough to know if it just went ahead and started charging anyway, the PV input voltage would immediately drop below 39V as soon as there was a load across the PV cells.
That was a bit of an edge case as two “nominal 12V” solar panels in series will almost always have lower Voc than your 48V lithium battery, especially once the solar cells have warmed up a little sitting in the sun. You could theoretically “jump start” the charging process in that case by temporarily putting a load across the PV leads to lower the voltage and trick the charge controller to start charging but personally I don’t want to have to resort to that kind of babysitting. I prefer to design my solar system to always be ready to push energy into the battery whenever the sun is shining regardless of whether I’m paying attention or not.
As a general rule, I would suggest keeping the Voc of the PV panels on the input side of your charge controller below 43V for nominal 48V lithium packs and below 46V for nominal 52V packs. It doesn’t matter if you achieve that one one panel or multiple panels in series.
LikeLike
Mark, what size solar panels (configuration) are you currently using in your 315 watt array. I have been trying to understand what is best to use and got stuck on the best voltage capacity of a panel and limitations of controllers and batteries. So the information you have provided has been gold! Many thanks for your willingness to share your experienced based learning with others. Very inspirational.
LikeLike
Hi Barry. Thanks for your kind words. I got a little carried away in my pursuit of maximizing the daily-energy-per-unit-weight ratio and had custom panels made to my specifications by SunCat Solar LLC. I have four modules each consisting of 4×6 Sunpower Maxeon Gen III Bin Le1 cells.
Keep in mind that this was after testing 5 or 6 solar arrays including a couple of attempts at scratch building from individual cells and laminating them myself. The current setup are race-grade panels and have the advantage of having much lower weight than any commercially available off the shelf product but at 10x the cost of entry-level semi-flexible panels. They are also much more fragile. If this is your first build, I recommend starting with a commercially available product and upgrading later if you feel the need.
LikeLike
Wow
LikeLike
What about some combination of solar panels with the new power packs like Bluetti that have sopphisticated Battery Management systems, controllers and battery all in a compact package
LikeLike
If you already own one of these kinds of larger power banks, by all means go ahead and use it for your first solar ebike setup. You get a battery pack, solar charge controller and AC inverter all in one package without needing to figure out how to connect everything together. And you can use your existing plug-in ebike charger. Unfortunately, that’s where the advantages end.
Since they only output 12V DC or 120/240V AC, you’ll need to carry an additional ebike battery charger which can convert to 36/48/52V DC (added weight and efficiency losses). The Bluetti ones I just Googled all use LiFePO4 cells which weigh up to double for the same Wh compared with top Li-ion ebike cells.
I want to minimize weight and maximize Wh to the motor. That means no DC-AC-DC conversion steps and just one battery so every Li-ion cell is connected to the motor controller and the charge controller at all times. This extends battery life by distributing peak motor demand across all cells and eliminates round-trip battery charge/discharge losses (~10%) when moving by sending solar power directly to the motor.
LikeLike
Hello Mark, I just found you in the internet while looking for inspiration on how to connect panels on our bikes. I tried many ways to mount the panels. Fiberglass, carbon, aluminium, pcv. One point mount, two point mount in front. No mount and two point mount in the back.
I am using the normal flexible low cost panels right now. I am just about to order my custom product line of flexible solar panels for ebikes and set up my store to offer all the tubings, pipes, connectors, and mounts. These panels will be wired different internally and will have 76V and 78V output from one 100-130W panel (ot two of 65W each at 38V). Would you preferably use such high voltage panels with a PWM, or do you see efficiency losses / gains in comparison to low voltage panels on an MPPT?
LikeLike
I last used a “PWM” solar charge controller (without Maximum Power Point Tracking) about 15 years ago, on my first solar ebike prototype, but only because that was the only product I could find for the solar voltage and battery voltage I was using back then. Marketing claims for MPPT chargers promise “up to 30%” more energy but I’ve never tested that myself. My ideal test setup would need to compare shaded and unshaded conditions, stationary and moving, measuring total energy over several days to represent real-world use cases.
My priority is maximum daily watt-hours and minimum weight so the relatively small price difference (relative to the total cost of a solar ebike setup) between PWM and MPPT is not worth it for me. As for buck vs boost, I don’t think it makes much difference as long as you keep the difference between solar voltage (input) and battery voltage (output) as small as you can because that’s how you minimize charger efficiency losses.
LikeLike